FAQ
Make sure that the top side (even surface) of the gel, and not the side that was removed from the backing, is placed towards the membrane for transfer. Otherwise, the result can be uneven transfer due to uneven contact between gel and membrane, resulting in disturbed resolution of the bands on the membrane.
Definition of %T and %C
The composition of any polyacrylamide gel is given by two parameters:
%T = concentration of total acrylamide
%T = [g (acryl + bis) / 100 ml] x 100
%C = % of the total acrylamide that is crosslinker
%C = [g (bis) / g (acryl + bis)] x 100
The total percent of acrylamide (%T) in the separating gel, which can range from 5 to 20%, determines the pore size. The percent of crosslinker (%C) used is generally 2.6% for all gels. The stacking gel has a very low total acrylamide concentration because the largest possible pore size is required. A typical stacking gel is 4% T, 2.6% C.
Running procedures
Setting the cooling temperature
Connect Multiphor II electrophoresis unit thermostatic circulator (e.g. to MultiTemp III) and set the temperature to 15 °C. Switch on the thermostatic circulator 15 minutes before starting the separation.
Positioning the gel on the cooling plate
Note: Wear clean gloves to avoid contamination of the gel surface, particularly when using sensitive silver stains.
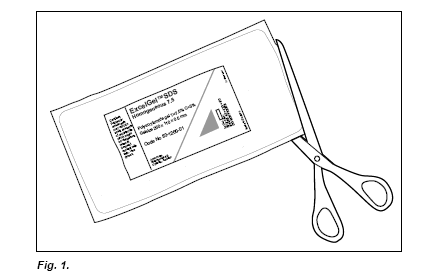
Open the gel package (Fig. 1.). Cut around the gel on two sides, about 1 cm from the edge to avoid cutting off the gel or the gel support protruding at the ends. Remove the gel from the package. If only half the gel is to be used, cut the gel in half with sharp scissors, re-seal the portion to be saved in the package with tape and store it in a refrigerator.
Take out the gel from the package. The gel is protected with a plastic film and the anodic side is marked with + and an arrow. Carefully remove the thin transparent plastic film from the gel. Pipette about 1 ml of insulating fluid (kerosene or light paraffin oil) onto the cooling plate of Multiphor II. Position the gel on the cooling plate with the sample wells at the cathodic side. Use the screen print as a guide. No air bubbles should be trapped beneath the gel.
Note: Place the Multiphor II lid in position as soon as possible to prevent dehydration of the gel.
Applying buffer strips
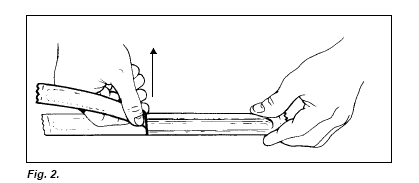
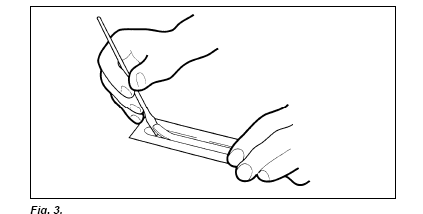
Open one cathodic and one anodic SDS buffer strip package. Remove the aluminium foil carefully by tearing it step by step, keeping the tearing edge in a perpendicular position (Fig. 2.). Remember to use Vinyl gloves when removing and applying the buffer strips. If the gloves stick to the buffer strips, moisten the gloves in distilled water. Loosen the strips at one end of the package by putting a spatula between the strip end and the plastic tray (Fig. 3.).
WARNING: Please be aware of that gloves must be used!
WARNING: Please be aware of that gloves must be used!
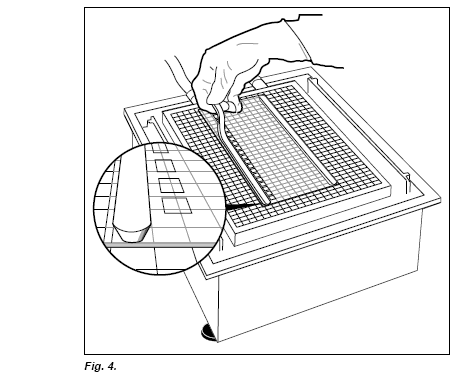
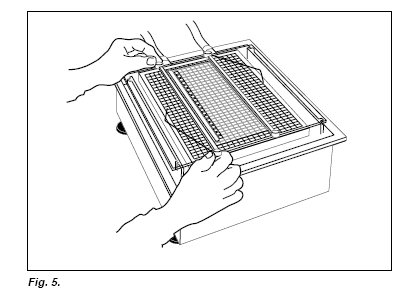
Carefully take out the strip from the tray and hold it with both hands about 2 cm away from the ends. Apply the cathodic and anodic SDS buffer strips to their respective sides of the gel (Fig. 4.).
Note: The narrow side of the strip should be placed on the gel surface. (If the strip breaks, put the pieces together on the gel surface).
Sample applications
Apply 5-17 µl sample/well, with a total protein amount of 1-10 µg/well when Coomassie staining is used and 0.05-0.5 µg when Silver staining is used. Apply 6 µl of DNA sample/well when silver staining is used.
Table 1. Recommended running conditions for one ExcelGel SDS Homogeneous gel.
| Gel | Voltage (V) | Current (mA) | Power (W) | Time (min) |
|---|---|---|---|---|
| ExcelGel SDS Homogeneous 7.5 | 600 | 50 | 30 | 80* |
| ExcelGel SDS Homogeneous 12.5 | 600 | 50 | 30 | 80* |
| ExcelGel SDS Homogeneous 15 | 600 | 50 | 30 | 140 |
* Approximate time, or until the Bromophenol blue front reaches the anodic buffer strip.
Note: If only half of a gel is used, divide the current and power settings by two.
When the Bromophenol Blue front reaches the anodic buffer strip the electrophoresis is complete and should be stopped. Remove the buffer strips.