Good column packing is essential for any chromatographic process and plays a key role in bioprocessing of biopharmaceuticals. A bed packed too densely might crack, which can lead to channeling and early breakthrough. A bed packed too loosely can further compress causing a liquid gap where mixing can occur. Either instance will lead to costly process disruptions and loss of valuable product. Proper column packing ensures a stable bed that performs according to expectations over many processing cycles.
We describe best practices for packing MabSelect PrismA™ resin in large-scale AxiChrom™ columns, BPG glass columns, and Chromaflow™ chromatography columns. The procedures we describe include robust and verified packing methods that will help you eliminate concerns and risks associated with poorly packed beds.
Click here for more resources on process-scale column packing.
MabSelect PrismA™ chromatography resin characteristics
MabSelect PrismA™ is an affinity BioProcess™ resin for capturing monoclonal and bispecific antibodies (mAbs and bsAbs) as well as Fc-containing recombinant proteins. The combination of a high binding capacity and a high-flow base matrix gives excellent productivity.
Flow velocity for MabSelect PrismA™ is at least 300 cm/h in an AxiChrom™ 300 column with 20 cm bed height at 20°C using process buffers with the same viscosity as water and pressure over bed < 2 bar.
The high-ligand stability of MabSelect PrismA™ reduces ligand leakage and offers exceptional alkali-tolerance. The protein A-derived ligand lets you use 0.5
to 1.0 M sodium hydroxide (NaOH) for cleaning in place (CIP). The resin offers highly concentrated elution pools, which gives you operating flexibility and small unit operation.
AxiChrom™ columns
AxiChrom™ columns are low-pressure, mechanical axial compression chromatography columns designed for process development and biopharmaceutical manufacturing environments (Fig 1). Mechanical axial compression enables accurate and reproducible control of the packing, even with large-diameter columns.
AxiChrom™ columns are available in many different configurations and materials. The columns are designed to give you scalable and predictable results over the entire range of scales by enabling a uniform plug flow through the bed, irrespective of column size.
The columns feature Intelligent packing with preprogrammed methods that support all column sizes. Intelligent Packing enables straightforward operation and high packing success rates. The chromatography column packing methods we describe here apply to bed heights of up to 30 cm in columns of up to 1000 mm i.d. We also provide a short guideline for larger columns.
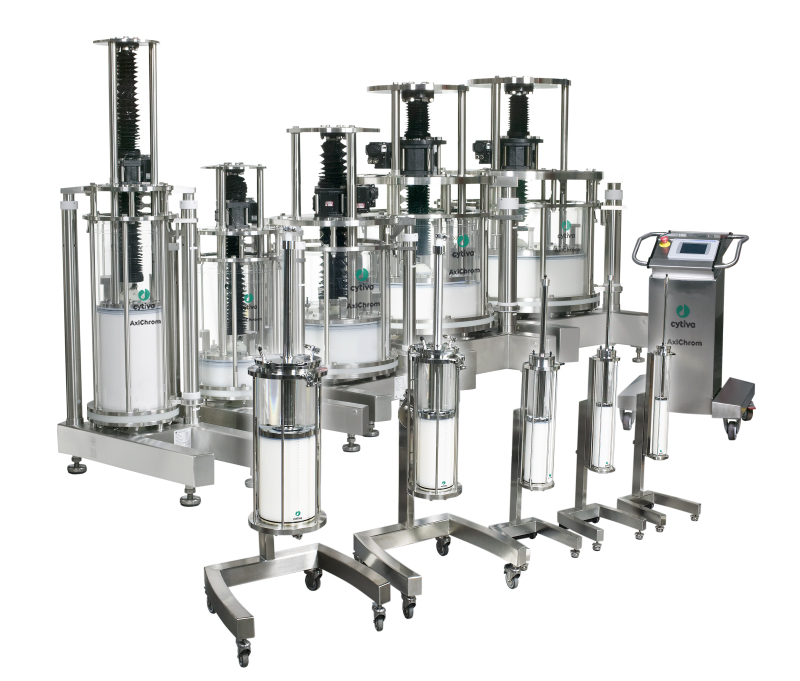
Fig 1. AxiChrom™ columns provide you with excellent packing control. We provide verified chromatography resin packing methods for these columns.
Packing MabSelect PrismA™ resin in AxiChrom™ columns
Definitions
The bed height of a gravity-settled bed differs from the bed height of a bed settled at low flow (consolidated). Therefore, the compression factor (CF) has to be separated from the packing factor (PF). In water, for example, the consolidated bed height (at 60 cm/h) is higher than the gravity settled bed height. For MabSelect PrismA™ resin the PF in this example would be 1.18 while the CF would be 1.1.
See how to calculate CF, PF, and column volume (CV) and other definitions in our column packing glossary.
When you pack BPG and AxiChrom™ columns, you use the PF in the packing procedure to calculate the packed bed height after the consolidation step. Use the CF in the resin preparation step to calculate the resin volume needed to pack a desired bed height. Because Chromaflow™ columns are pack-in-place columns, they have no registered consolidated bed heights and you should use CF throughout the packing process.
Properties of MabSelect PrismA™ resin in various packing solutions
MabSelect PrismA™ resin settles differently in different solutions. Adding NaCl to the packing solution slows the settling of the resin beads and allows them to settle less tightly. As little as 1 mM NaCl increases the consolidated bed height by 2% compared to consolidation in water. It's important to measure the chromatography resin in the correct solution to minimize the effect on settling.
Water is the preferred packing solution for MabSelect PrismA™ in AxiChrom™ 50 to 1600; however, you can use other solutions such as storage solution or decanted storage solution.
Table 1 shows typical PFs for MabSelect PrismA™ in different solutions if the recommended packing solution cannot be used. The listed PFs are also relevant for large-scale AxiChrom™ columns with an i.d. of 300 mm or larger, at a bed height of 20 cm.
Table 1. Typical packing factors for MabSelect PrismA™ resin in different solutions for optimal bed performance where the bed is consolidated at 60 cm/h
| Solution | Packing factor |
|---|---|
| Water | 1.18 |
| 20% ethanol | 1.18 |
| 10 mM NaCl | 1.20 |
| 400 mM NaCl | 1.20 |
| 2% benzyl alcohol | 1.181 |
1 2.0% v/v benzyl alcohol is compatible with the acrylic material used in AxiChrom™ columns at up to 24°C and for up to one year.
You will need a variable PF depending on bed height to optimize the bed and flow performance of MabSelect PrismA™ in the larger AxiChrom™ columns ≥ 300 mm. Figure 2 shows PFs for MabSelect PrismA™ packed in AxiChrom™ 300 to 1600 with a bed height of 10 to 30 cm for packing in water.
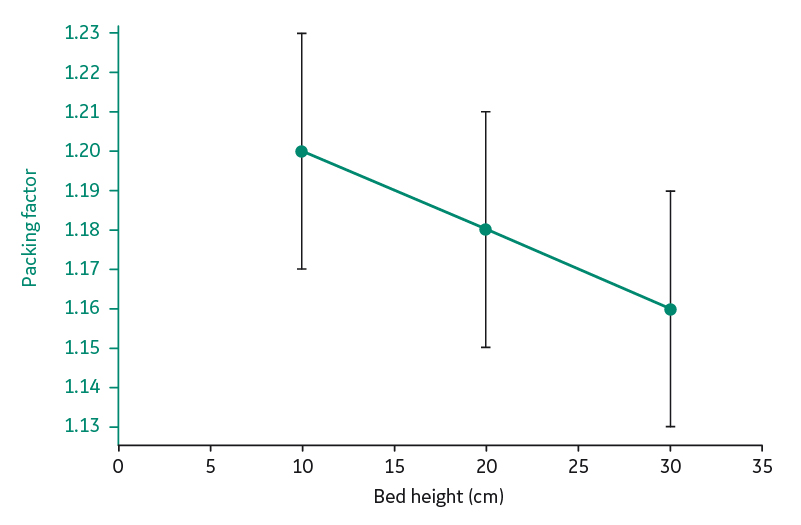
Fig 2. PF interval for AxiChrom™ 300 to 1600 columns packed with MabSelect PrismA™ resin to different bed heights in water with a consolidation velocity of 60 cm/h. The PF varies in relation to bed height and is calculated as y = −0.002x + 1.22 (where y is the calculated PF and x the packed bed height). For each bed height, the acceptable interval for the packing factor is ± 0.03.
Slurry preparation
Start by calculating the resin volume (V) needed to pack the desired bed height. In this step, use CF 1.10, which is the CF in 20% ethanol for the gravity-settled resin. This CF corresponds to the right packing factor in the method.
Measuring slurry concentration
To achieve the correct amount of chromatography resin for packing to target bed height or compression, it is important that you measure the slurry concentration correctly. Measure slurry concentration with a Tricorn™ 10/100 column. We offer a Slurry Concentration Kit with all the materials required for determination of slurry concentration.
Packing MabSelect PrismA™ in AxiChrom™ columns
You may use both 10 and 20 µm bed supports (SS and PE) in AxiChrom™ columns with MabSelect PrismA™. If you are working with a crude feed, the 20 µm bed support is recommended. When packing AxiChrom™ 50 to 200 columns with ÄKTA™ systems, Intelligent Packing control is managed by the UNICORN™ system control software. Intelligent Packing of AxiChrom™ 300 to 1600 columns is performed by AxiChrom™ Master, a separate unit that comprises a touchscreen-operated user interface. On ÄKTA™ process system, Intelligent Packing is performed from the system’s UNICORN™ software.
Intelligent packing in AxiChrom™ columns — general considerations
Chromatography column packing methods when you enter values for the packing variables (e.g., column, resin, slurry concentration, target bed height) in the Intelligent Packing wizard. The PF given in the Intelligent Packing wizard is dependent on entered packing variables and the packing solution. To pack the column, start the chosen method in the UNICORN™ software and follow the instructions.
When you pack AxiChrom™ 50 to 200 columns, the slurry is introduced into the column by hand and adapter movement is driven by internal hydraulics. A slurry recipe can be generated with packing solution recommendations for ÄKTA™ chromatography systems with Intelligent Packing support for AxiChrom™ 50 to 200 columns. The recipe is valid for slurry concentration measurements performed with resin in 20% ethanol that has settled by gravity. The method controls the flow rate of hydraulic fluid to drive the adapter and packing of the bed (Fig 3).

Fig 3. Intelligent Packing in small AxiChrom™ columns. The adapter is mounted to the column tube and the wizard is started (Start). The adapter moves down, forcing packing liquid out through the bottom bed support. The resin forms a consolidated bed (Consolidation). When the adapter contacts the consolidated bed surface, the operator initiates bed compression in the UNICORN™ wizard (Compression start). Compression occurs according to a predetermined PF. The target bed height is attained (Packed).
Column packing in larger AxiChrom™ columns
Slurry is introduced via a resin valve in the center of the bottom bed support and the adapter is driven by an electric servomotor in AxiChrom™ 300 to 1600 columns. The two-position resin valve enables filling, packing, and unpacking without adjusting the assembled column.
After you have primed the column, the adapter rises from its lowest position and the column fills with slurry via the resin valve. You calculate slurry volume automatically from the target bed height, slurry concentration, and PF. As an electric servomotor controls the movement of the adapter, its position is monitored with millimeter accuracy.
When you have drawn the correct slurry volume into the column, the adapter starts to move downwards, and packing buffer is forced out through the bottom bed support and bed consolidation starts.
The Intelligent Packing wizard detects when the adapter meets the consolidated bed. When this occurs, you confirm the bed detection.
The compression of the resin starts, and a graphical interface is shown on the control screen of UNICORN™ or AxiChrom™ Master. This graphical interface assists you in finishing the packing, giving a well-packed bed. When the adapter symbol is within the range of approved packing factors and bed height limits, you can end the packing.
If selected in the UNICORN™ wizard, Intelligent Packing will automatically run a packed bed evaluation test after the packing. You can also create automatic methods for priming and unpacking for large AxiChrom™ columns.
Additional alternatives for packing the AxiChrom™ 300 to 1600 columns are available depending on the AxiChrom™ Master version and installed control software. You select one of the alternatives for packing before the packing process can start.
Contact your Cytiva representative for more information about automated AxiChrom™ functionality.
AxiChrom™ column packing results
AxiChrom™ columns packed with the methods outlined above were tested for plate number, asymmetry, pressure-flow properties, and stability.
Table 2 provides examples of efficiency and stability results for MabSelect PrismA™ packed in AxiChrom™ columns ranging from 50 to 1600 mm i.d. These results show that the verified packing methods used give excellent packing AxiChrom™ columns. The stability test showed that the beds were stable when running in water at the velocities given in Table 2.
Table 2. Column efficiency data for different packings of MabSelect PrismA™ in different AxiChrom™ columns at different bed heights
| Column | Bed height (cm) | Average plates/m1 | Reduced plate height (h) range1 | Asymmetry factor (As) range1 | Flow velocity for stability test (cm/h)2 | Change after stability test (%) | |
|---|---|---|---|---|---|---|---|
| h | As | ||||||
| AxiChrom™ 50 | 10 | 10 900 | 1.4–1.6 | 1.1–1.1 | 600 | -2 | 0 |
| 20 | 11 000 | 1.5–1.5 | 1.0–1.0 | 300 | 7 | 1 | |
| 40 | 11 400 | 1.4–1.5 | 0.8–0.9 | 150 | 5 | 2 | |
| AxiChrom™ 100 | 10 | 12 000 | 1.3–1.4 | 1.1–1.1 | 600 | 7 | 4 |
| 20 | 12 100 | 1.3–1.4 | 1.0–1.1 | 300 | 5 | 3 | |
| 40 | 10 900 | 1.4–1.6 | 1.0–1.1 | 150 | 3 | 2 | |
| AxiChrom™ 140 | 20 | 12 300 | 1.3–1.4 | 1.0–1.1 | 300 | 3 | 4 |
| AxiChrom™ 200 | 10 | 11 200 | 1.4–1.5 | 1.2–1.3 | 600 | 5 | 6 |
| 20 | 11 700 | 1.4–1.4 | 1.1–1.1 | 300 | 4 | 5 | |
| 40 | 11 100 | 1.4–1.5 | 1.0–1.1 | 150 | -2 | 4 | |
| AxiChrom™ 300 | 10 | 10 000 | 1.6–1.7 | 1.3–1.4 | 600 | -3 | -6 |
| 20 | 11 000 | 1.5–1.6 | 1.1–1.2 | 300 | -3 | -4 | |
| 30 | 10 800 | 1.4–1.6 | 1.0–1.3 | 200 | 7 | -7 | |
| AxiChrom™ 6003 | 20 | 10 300 | 1.5–1.5 | 1.1–1.1 | 300 | -2 | 3 |
| 30 | 10 100 | 1.5–1.6 | 1.1–1.1 | 200 | 5 | 4 | |
| AxiChrom™ 10003 | 10 | 11 700 | 1.4−1.5 | 1.2−1.4 | NA | NA | NA |
| 20 | 11 100 | 1.5−1.6 | 1.1−1.2 | 300 | 3 | 3 | |
| 30 | 10 200 | 1.5−1.8 | 0.9−1.1 | NA | NA | NA | |
| AxiChrom™ 16003 | 10 | 10 900 | 1.4−1.7 | 1.2−1.4 | 550 | -2 | -1.5 |
| 20 | 10 400 | 1.5−1.7 | 1.1−1.2 | 300 | 0 | 6 | |
| 30 | 10 000 | 1.6−1.8 | 1.1−1.2 | 200 | -2 | 0 | |
1 Test performed at near optimal test conditions. Average and ranges of upflow and downflow tests for at least three packings.
2 Stability tests were run once for each bed height/resin/column combination in water for 16 h at the given velocity.
3 Results from studies performed on MabSelect PrismA™ base matrix.
Pressure-flow curves provide you with a simple, yet effective illustration of column performance in terms of the maximum operating velocity at which the purification process can be run. These curves also show you the magnitude of the back pressure in the system at a certain liquid velocity. AxiChrom™ columns can use the full flow potential of MabSelect PrismA™, even at large column diameters (Fig 4 to 9).
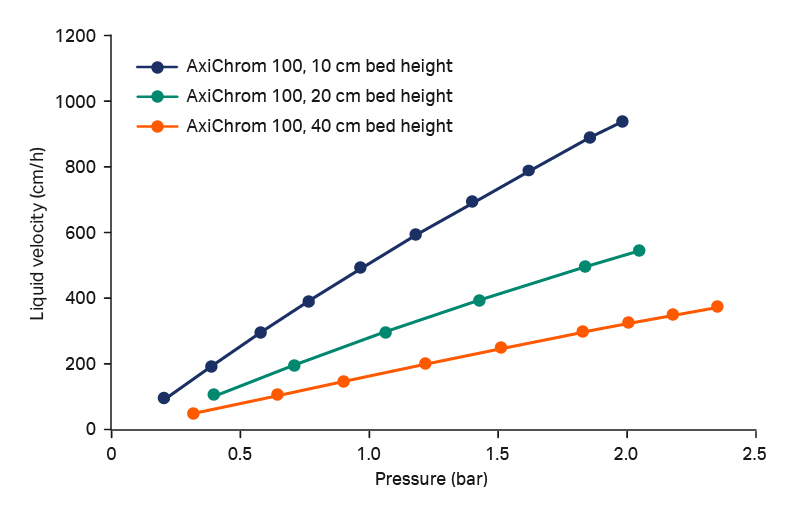
Fig 4. Pressure flow curves for MabSelect PrismA™ resin packed in AxiChrom™ 100 at different bed heights. The results are normalized to 10, 20, and 40 cm bed height in water at 20°C. Tubing and system pressure are excluded.
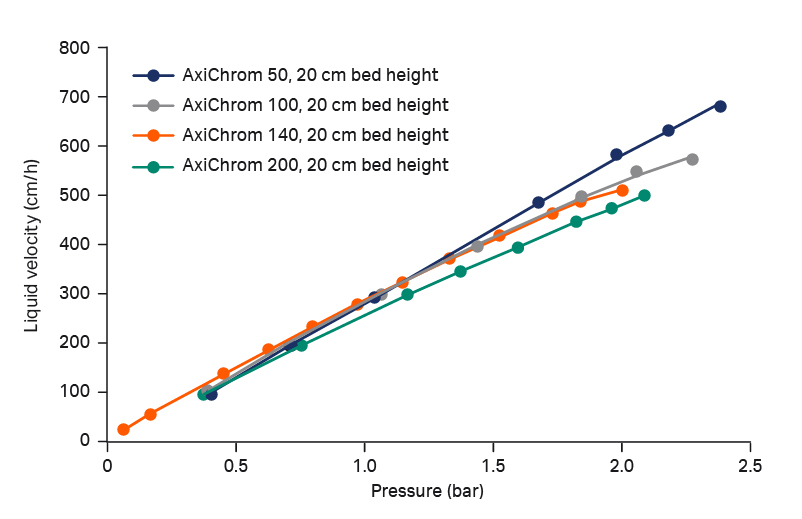
Fig 5. Pressure flow curves for MabSelect PrismA™ resin in AxiChrom™ 50, 100, 140, and 200 columns at 20 cm bed height. The results are normalized to 20 cm bed height in water at 20°C. Tubing and system pressure are excluded.
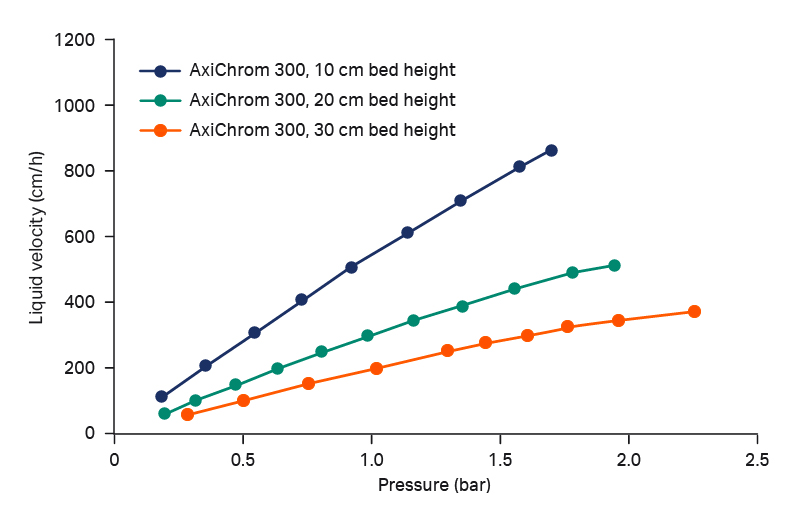
Fig 6. Pressure flow curves for MabSelect PrismA™ resin packed in AxiChrom™ 300 at different bed heights. The results are normalized to 10, 20, and 30 cm bed height in water at 20°C. Tubing and system pressure are excluded.
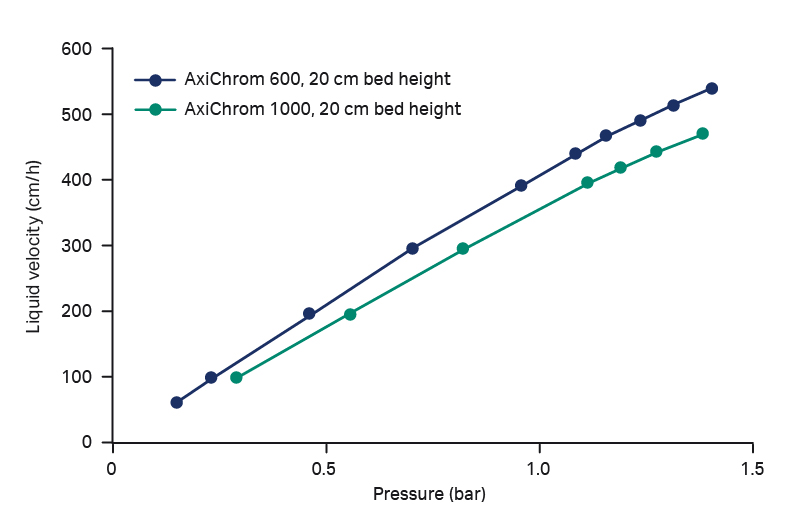
Fig 7. Pressure-flow curve for the MabSelect PrismA™ base matrix at 20 cm bed height in AxiChrom™ 600 and 1000. The results are normalized to 20 cm bed height in water at 20°C. Tubing and system pressure are excluded.
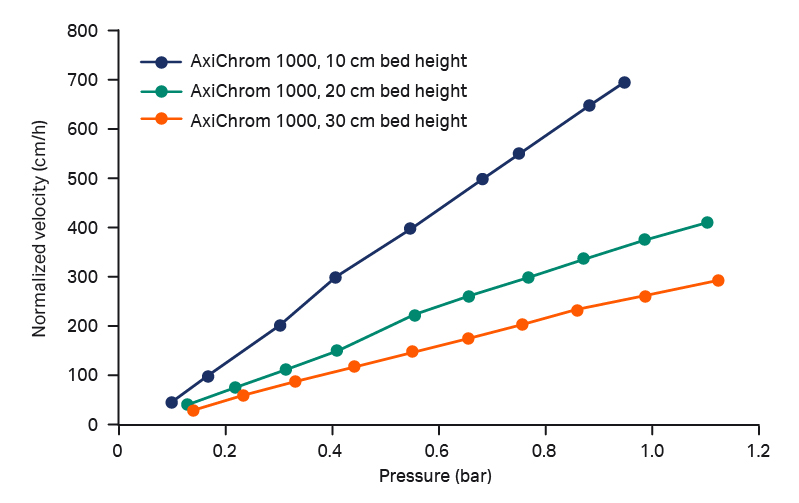
Fig 8. Pressure-flow curve for the MabSelect PrismA™ base matrix in AxiChrom™ 1000 at 10, 20, and 30 cm bed height at the optimal compression for each bed height according to Figure 2. The results are normalized to 20 cm bed height in water at 20°C. Tubing and system pressure are excluded.
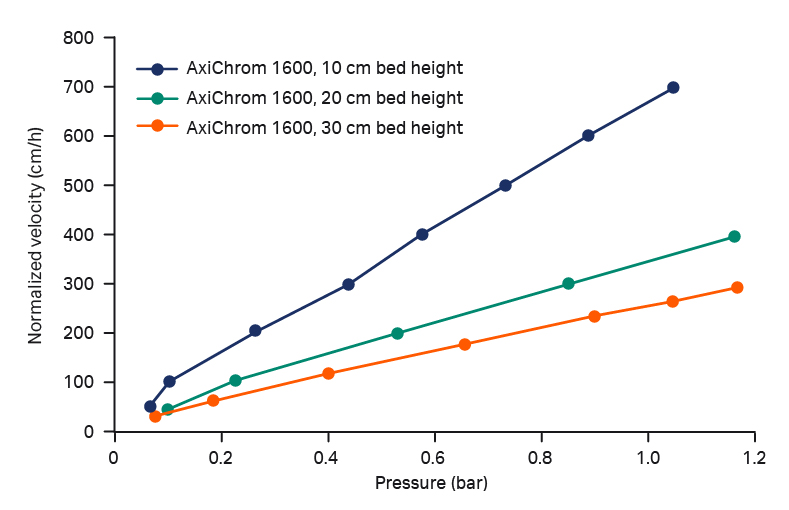
Fig 9. Pressure-flow curve for the MabSelect PrismA™ base matrix in AxiChrom™ 1600 at 10, 20, and 30 cm bed height at the optimal compression for each bed height according to Figure 2. The results are normalized to 20 cm bed height in water at 20°C. Tubing and system pressure are excluded.
BPG columns
BPG columns are glass columns for process development and manufacturing. The single-screw adapter allows easy and efficient packing and running. The columns have diameters from 100 to 450 mm. The column packing methods described here are developed in BPG 300.
Packing MabSelect PrismA™ in BPG columns
Summary of the verified packing method in BPG 300 at 20 cm bed height
Slurry and packing solution: 20% ethanol
Slurry concentration: 60% (± 2)
Consolidation velocity: 30 cm/h (21.2 L/h)
Consolidation time: 50 min (± 5)
Mechanical compression (packing factor): 1.13 (± 0.01)
Column and system preparation
A detailed description of column preparation is available in the BPG column operating instructions. The packing pump should be as pulsation-free as possible. Screw or rotary lobe pumps are the most suitable for this task and multiheaded diaphragm pumps are satisfactory.
Note! Before you start column packing, ensure that the chromatography column has no visible scratches in the glass tube and that the adapter moves smoothly in both upward and downward directions. In addition, you should not find tightening the adapter O-ring to the column inner wall difficult.
Follow the steps below to prepare the BPG column:
- Place a new 10 μm net on both adapter and bottom end piece.
- Level the column with the aid of a spirit level.
- A pressure relief valve should be used for safety reasons, especially against pressure spikes. Position this valve on the pump outlet and add a pressure gauge on the adapter.
- Mount one 4-port, 2-way valve on bottom inlet and one on top of the pressure gauge, 10 mm i.d. for BPG 300.
Resin preparation
Dilute the resin slurry to the desired concentration using 20% ethanol.
Packing procedure
- Set the pressure alarm or pressure relief valve according to the pressure specification (4 bar). Purge the system and tubing from air.
- Purge the net of trapped air by draining packing solution through the column outlet until about 2 cm of solution remains in the column. Close the bottom valve. If air is still trapped under the end-piece net, add more packing solution and connect a tube to the suction side of a pump. Start the pump and place the pump inlet tube on the bottom net and extract the remaining air.
- Add the slurry to the column and, if needed, additional packing solution to about 40 cm. Mix the resin and the packing solution to a homogeneous slurry. Note! The available height to allow the adapter to be inserted into a 50 cm column tube (for filling slurry) is 40 cm. Use a longer column tube when packing beds higher than 20 cm (75 cm and 95 cm tubes are available).
- Rinse the wall from particles and let the resin settle until there is about 1 cm of clear liquid on top of the slurry. This reduces the risk of particles sticking between the O-ring and the column wall, which can cause the column to leak.
- Insert the adapter and secure it to the column tube. Lower the adapter to the surface of the slurry and allow some clear liquid to pass the O-ring. Tighten the adapter O-ring.
- Make sure the column top valve is open. Slowly move the adapter down until no air bubbles can be seen leaving the top valve.
- Start the pump and adjust the settling velocity to 30 cm/h. Shift the top valve into the column and immediately open the bottom valve and lead the liquid to waste.
- Run the settling flow until the bed is completely consolidated. Note the consolidated bed height and calculate the packed bed height using the PF (1.13) in 20% ethanol. The packed bed height is the ratio between the consolidated bed height and the packing factor. Use a marker to indicate the packed bed height on the column.
- Stop the flow and close the top valve. Loosen the O-ring and lower the adapter down to 1 cm above the settled bed and seal the adapter O-ring. Shift the bottom valve to waste and use the adapter to mechanically compress the bed to the mark on the column (step 8). Excess packing solution is removed through the bottom of the column.
Your column is now ready for use.
BPG column results
Examples of efficiency and stability results for MabSelect PrismA™ are shown in Table 3. Good plate numbers and asymmetry factors were achieved.
Table 3. Column efficiency data for MabSelect PrismA™ packed in a BPG column with 300 mm i.d.
| Column | Bed height (cm) | Average plates/m1 | Reduced plate height (h) range1 | Asymmetry factor (As) range1 | Flow velocity for stability test (cm/h)2 | Change after stability test (%) | |
|---|---|---|---|---|---|---|---|
| h | As | ||||||
| BPG 300 | 20 | 8000 | 1.7–2.8 | 1.2–1.5 | 300 | 6 | 3 |
1 Test performed at near optimal test conditions. Average and ranges of upflow and downflow tests for at least three packings.
2 Stability tests were run once for each bed height/resin/column combination in water for 16 h at the given velocity.
The pressure-flow curve for the resin in BPG 300 column is shown in Figure 10. The pressure-flow profile for MabSelect PrismA™ in BPG 300 at 20 cm bed height shows that you can run the resin at 300 cm/h with a pressure of less than 2.0 bar over the bed.
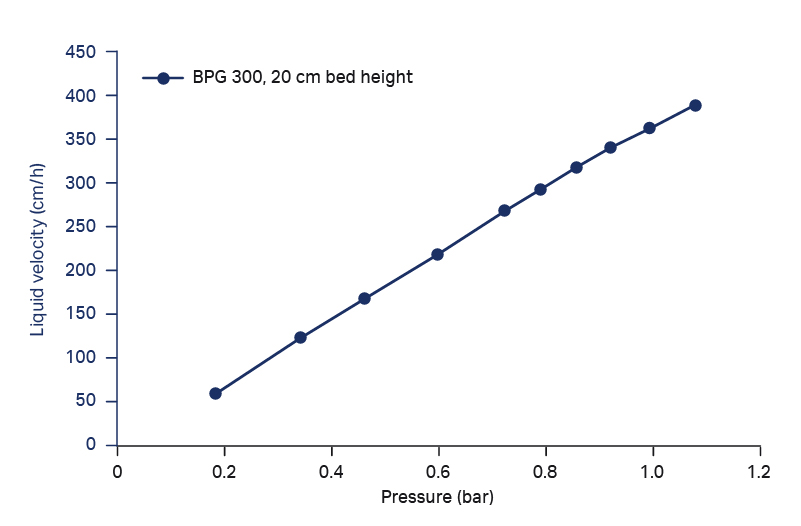
Fig 10. Pressure/flow rate study on MabSelect PrismA™ resin packed at 20 cm bed height in a BPG 300 column. The results are normalized to 20 cm bed height in water at 20°C. Tubing and system pressure are excluded.
Chromaflow columns
You can pack MabSelect PrismA™ in Chromaflow™ 600 column at 20 cm bed height with good results. Packing is performed with resin in water and a standard packing method. You pack the resin at 3 bar and the packing is stopped when the bed reaches a point 5 mm from the top bed support. It should also be possible for you to pack Chromaflow™ 400, 800, and 1200 with this method by using Packing Stations PS50, PS200, or PS400, respectively.
Note! We do not recommend Chromaflow™ 1000 and 1400–2000 columns due to limitations in flow restriction/capacities for packing the PrismA™ resin. Instead, we recommend AxiChrom™ columns for use with MabSelect PrismA™ resin because they utilize the resin’s pressure and flow properties with stable, well-performing beds.
Packing MabSelect PrismA™ resin in Chromaflow™ columns
Summary of verified packing method in Chromaflow™ 600 at 20 cm bed height
Pressure: Chromaflow™ Packing Station Pack PS100 start pressure = 5.5 bar. Pressure is kept at 3 bar once column pressure has reached that level.
Packing solution: purified water
Stop position: 5 mm from adapter screen
Slurry concentration: ~ 50%
Preparations
The method described below lets you pack a Chromaflow™ 600 column at 20 cm bed height and is based on a standard Chromaflow™ procedure (i.e., via nozzles in the top and bottom bed supports, and without removing the lid or adapter). This method makes use of the optional Chromaflow™ Packing Station, which includes a control panel with pneumatically actuated diaphragm pumps and valves, and a tank to hold the slurry.
The MabSelect PrismA™ resin is delivered in a 20% ethanol solution. It is, however, preferable to perform the packing in water. Therefore, we recommended that you first do an equilibration packing in water before the final column packing.
You can avoid introducing air into the column when packing by adding additional slurry for the extra volumes in the packing station, tank, and tubing. Add the slurry to the slurry tank and stir the resin. Adjust the suspension to about 50% slurry concentration.
Column preparation
A more detailed description about the column and pack station preparation can be found in the operating instructions for Chromaflow™ columns and Chromaflow™ Packing Stations. In this procedure, standard Chromaflow™ nomenclature is used for connections on the column and packing station.
Note! It is important that the supply air flow rate follows the specification of the Chromaflow™ Packing Station (100 L/min for Packing Station PS100) and that the supply air pressure into the packing station is 6 to 7 bar.
- Prepare the column according to the Chromaflow™ columns operating instructions. Tubing, valve connections and bed height.
- A pressure relief valve should be used for safety reasons (see Chromaflow™ operating instructions and the column product documentation for pressure limitations). Position this valve on the slurry inlet top (SIT), with the waste tubing connected to the slurry tank. Place a pressure gauge on the mobile phase top (MPT) to record the pressure during packing. Mount one 3-port, 2-way valve on top of the pressure gauge and one on the mobile phase bottom (MPB). The top valve should lead in two directions: one side into the system and one to waste for purging the tubing. On the bottom valve, one side leads to the system and a 1.5” to 2” tubing leads to waste (for packing). Part of the MPB waste tubing should be placed above the outlet valve to prevent air from entering through the MPB.
- Connect appropriate tubing (i.d. 1” or 1.5”) and tanks to the column and packing station. If a flow meter is used, place it between the SIT and the packing station.
- Level the adapter to the desired bed height. Remember to loosen the nuts on the adapter rods to allow the adapter to be raised or lowered. Flush the adapter rods with 20% ethanol as lubrication.
- Prime the column, packing station, and tubing with water according to the operating instruction.
Packing procedure
Note! Packing Chromaflow™ columns is a rapid procedure compared with other packing procedures and it is therefore important that you thoroughly read the packing instructions and practice the packing steps in advance of the column packing.
- Set both nozzles in run position to prime the top nozzle tubing with slurry. Lead the slurry outlet top (SOT) tubing back to the slurry tank and secure it. Stir the slurry to keep it homogeneous, select slurry and SIT on the packing station, open the slurry tank, and start the packing pump.
- As the aim of this procedure is to prime the tubing and allow the pump speed to be set, the chromatography column is bypassed at this stage. Increase the pump flow until the pressure on Chromaflow™ Packing Station Pack 100 equals 5.5 bar (or about 101 L/min).
- When the tubing is primed and the flow rate set, set the SIT/slurry inlet bottom (SIB) valve to the position between SIT and SIB on the Chromaflow Packing Station to block the flow during step 4, while maintaining the pump pressure/correct flow rate for the next step. If a flow meter with flow totalizer function is used, reset the flow totalizer.
- Move the top nozzle down into the packing position.
- Simultaneously open the bottom mobile phase valve to waste and turn the SIT/SIB valve to SIT on the packing station, this is preferably done by two operators. The column then starts to fill with slurry and the bed builds up slowly from the bottom as excess liquid exits via the MPB.
Note! Column pressure should not exceed the operating pressure limit of the column (i.e., 3 bar). If this pressure is reached, gently decrease the packing flow so that the pressure remains just below 3 bar. - Stop the packing pump when the bed is 0.5 cm from the top bed support by setting the SIT/SIB to the position between SIT and SIB, as described in step 3.
Note! If a non-transparent (e.g., stainless steel) column tube is used, stop the packing flow when the calculated volume of slurry, has been introduced into the column. Check the volume in the slurry tank or use a volume totalizator. - Immediately move the top nozzle back to the run position. The bed will then expand until it reaches the adapter.
- Close the MPB valve when the pressure in the column is between 0.3 and 0.1 bar. If a flow totalizer is used, register the total slurry volume pumped through the column.
- Use packing solution to rinse residual resin from the tubing and the top nozzle. Pump the packing solution through the top nozzle back into the slurry tank.
- Close the slurry tank and empty the tubing between the tank and packing station.
- Equilibrate the packed bed up flow to remove any trapped air in the column.
Figure 11 shows the column pressure and flow velocity used when packing a 20 cm bed height in Chromaflow™ 600 column. The graph shows that the pressure is kept constant at 3 bar after 60 s.
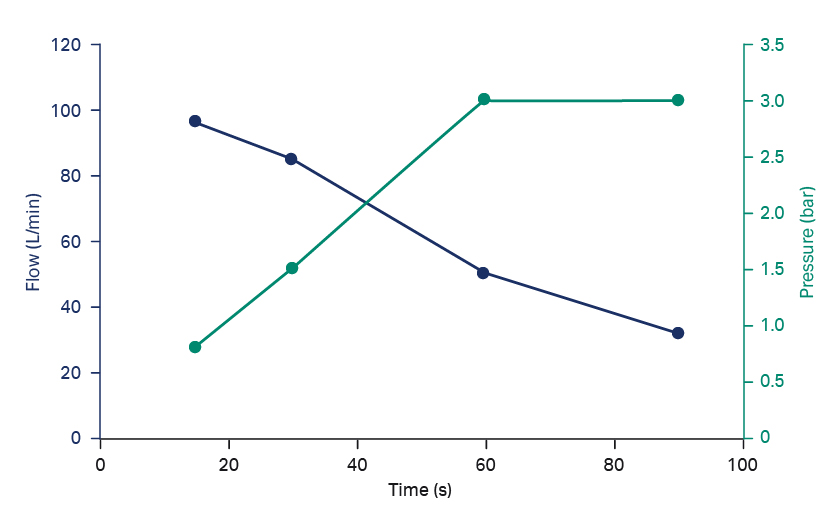
Fig 11. Column pressure and flow velocity during packing of a 20 cm bed height in Chromaflow™ 600 using Chromaflow™ Packing Station Pack 100.
Chromaflow™ column results
The efficiency results for MabSelect PrismA™ packed in Chromaflow™ 600 are shown in Table 4. Good plate numbers and asymmetry factors were achieved.
Table 4. Column efficiency data for different packings of MabSelect PrismA™ base matrix in a Chromaflow™ column with 600 mm i.d.
| Column | Bed height (cm) | Average plates/m1 | Reduced plate height (h) range1 | Asymmetry factor (As) range1 | Flow velocity for stability test (cm/h)2 | Change after stability test (%) | |
|---|---|---|---|---|---|---|---|
| h | As | ||||||
| Chromaflow™ 600 | 20 | 8000 | 1.8–2.3 | 0.9–1.1 | 300 | 9 | 6 |
1 Test performed at near optimal test conditions. Average and ranges of upflow and downflow tests for at least three packings.
2 Stability tests were run once for each bed height/resin/column combination in water for 16 h at the given velocity.
The pressure-flow curve for Chromaflow™ 600 is shown in Figure 12. The pressure-flow profile for MabSelect PrismA™ in Chromaflow™ 600, at 20 cm bed height, shows that the resin can be run at 300 cm/h with a pressure of less than 2.0 bar over the bed.
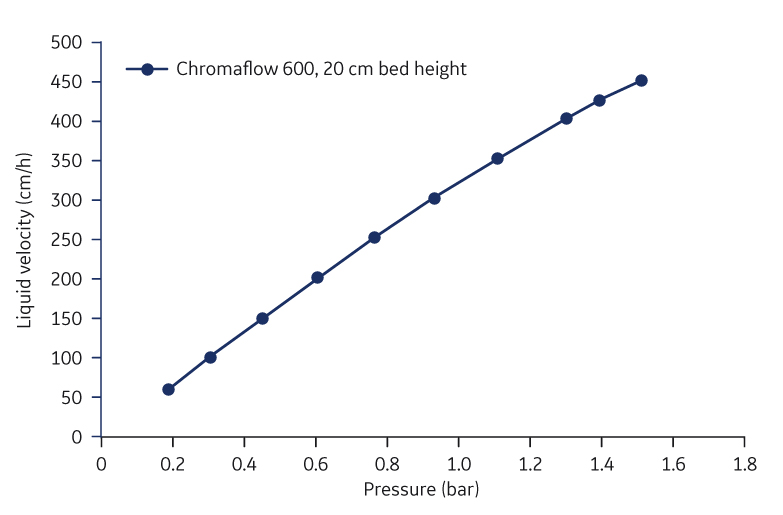
Fig 12. Pressure-flow curve for the MabSelect PrismA™ base matrix at 20 cm bed height in Chromaflow™ 600. The packed bed compression was 1.08. The results are normalized to 20 cm bed height in water at 20°C. Tubing and system pressure are excluded.
Testing the performance of the packed column
Your process-scale chromatography columns must perform with a high degree of efficiency over many processing cycles (i.e., display high stability). The efficiency of your packed column can be expressed in terms of height equivalent to a theoretical plate (HETP) and asymmetry factor (As). Repeat the test regularly to monitor the state of the bed throughout the working life of the column.
Keep conditions such as fluid velocity (cm/h), liquid pathway, sample composition, and elution buffer constant to ensure that your test results are comparable over time. You should set the requirements for the test in accordance with test conditions and the goal of the purification. We describe the test further in the application note Column efficiency testing.
Test conditions used in this study
Sample: 2% v/v acetone
Sample volume: 1% of the CV
Test velocity: 30 cm/h for AxiChrom™, BPG, and Chromaflow™ columns
Eluent: water
To compare the performance of columns packed with chromatography resin of different particle diameters, the reduced plate height (h = HETP/average bead diameter [dp]) is typically used. As a guideline, a value of h ≤ 3 is considered good at optimal test conditions.
Efficiency tests at different flow velocities
Efficiency tests were run at different flow velocities. Figure 13 shows a van Deemter plot of the results. The asymmetry factor is stable at the different flow velocities. The reduced plate height increases with the flow velocity, which is in accordance with the van Deemter equation. In this study, optimal results were achieved at 20 to 40 cm/h.
When running at higher flow velocities, the asymmetry factor and reduced plate height continued to show a linear correlation, which means that you can run the efficiency test at any flow velocity.
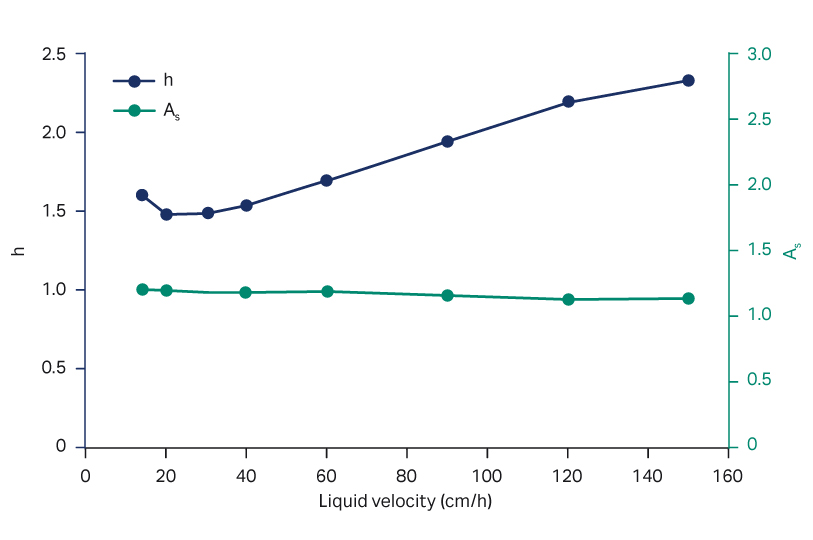
Fig 13. van Deemter plot for AxiChrom™ 300 packed with MabSelect PrismA resin at 20 cm bed height.
Ordering information
- Data file, instructions, and related documents: MabSelect PrismA™ resin
- Data file, instructions, and related documents: AxiChrom™ 50-200 columns
- Data file, instructions, and related documents: AxiChrom™ 300-1600 columns
- Data file, instructions, and related documents: BPG columns
- Data file, instructions, and related documents: Chromaflow™ columns
- Data file: Media wand
- Application note: Column efficiency testing
- Instructions: Chromaflow™ Packing Station Pack 50, 100, 200, and 400